A customer says the bike "just dies" on hills or when they open the throttle hard, then comes back after a few seconds. It is one of the most common e-bike complaints, and one of the easiest to misdiagnose by swapping parts. This checklist puts the checks in the order that finds the cause fastest, and keeps you from replacing a controller when the real problem is a tired battery or a burnt connector.
Safety first. E-bike batteries store a lot of energy. Work on a bench, keep the bike off the ground when the motor may turn, use insulated tools, and never short battery terminals. If a battery is swollen, damaged or has been wet, stop and handle it as a hazard.
1. Get the story before the meter
Ask, and write down:
- When does it cut out? Hills, hard starts, high assist levels, only when the battery is low, only when it is hot or cold?
- What exactly happens? Does the display go off, or does the display stay on while the motor stops? Does an error code appear?
- How does it recover? On its own after a few seconds, after switching off and on, or only after charging?
- What changed? New battery, crash, wash, a recent repair, a different charger.
The answer to "does the display go off?" already splits the problem in two. If the whole system loses power, suspect the battery side first. If the display stays on but the motor stops, the controller or a sensor input is more likely.
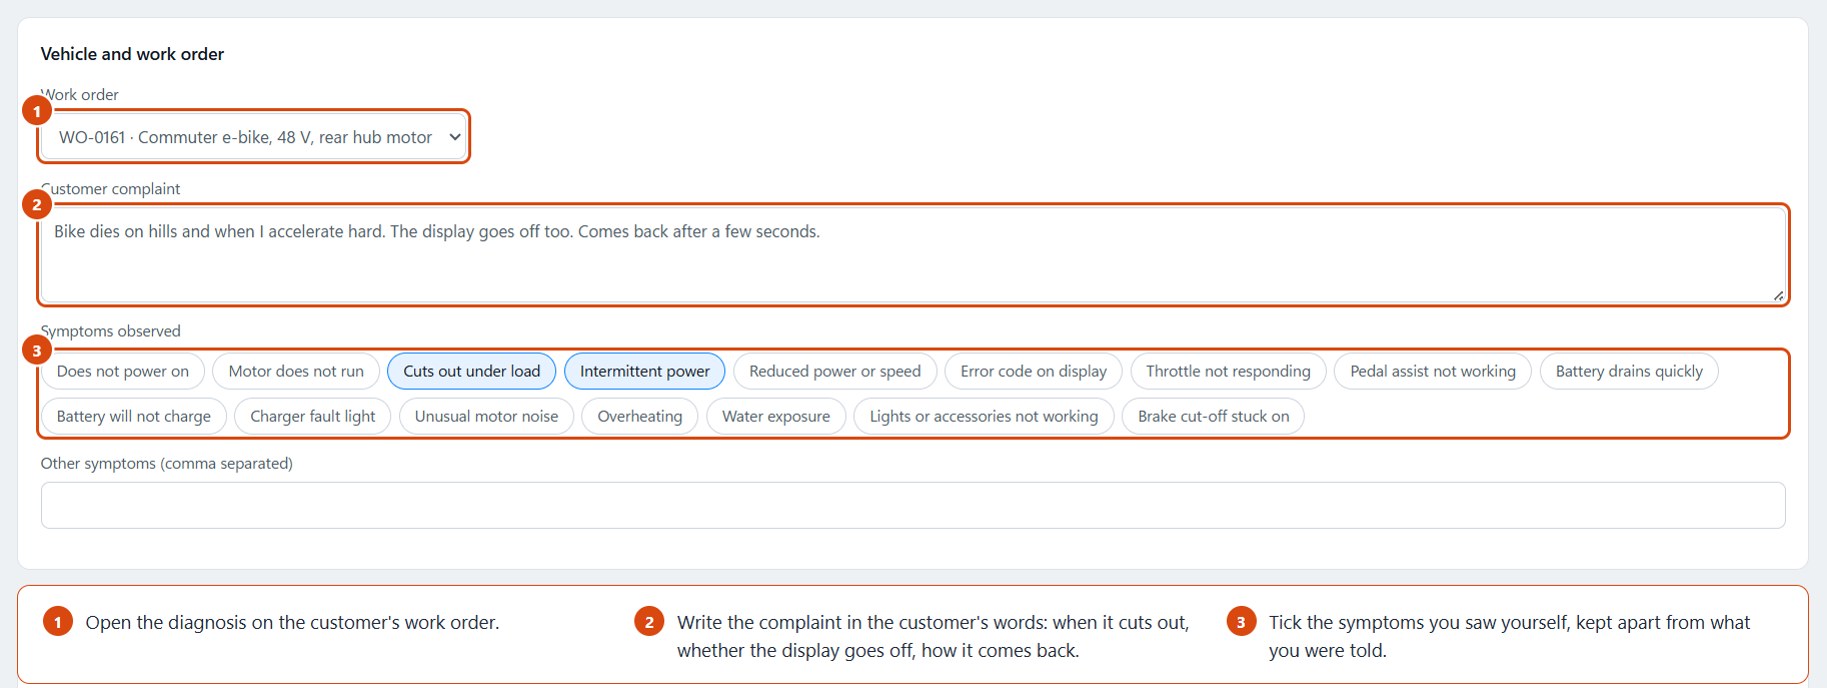
Recording the story in EVCore Studio, using a sample job. The complaint goes in the customer's own words, and the symptoms you saw yourself are ticked separately.
2. Read any error code
If the display shows a code, record it exactly as shown. Codes differ between brands and controllers, so look it up in the manufacturer's documentation for that system rather than a generic list. A code points you to a subsystem; it does not prove which part has failed.
3. Battery: compare voltage at rest and under load
A battery can show a healthy voltage at rest and still collapse when the motor draws current. A weak cell group, high internal resistance or an aging pack makes the voltage sag under load until the controller's low-voltage cut-off, or the battery's own protection (BMS), switches the power off. When the load goes away, the voltage recovers and the bike works again, which matches the classic "comes back after a few seconds" story.
- Charge the battery fully, then measure the voltage at the battery output at rest.
- Measure again under load: at the controller input while the motor works against a load on the bench, or with a suitable load tester.
- Compare both readings with the battery's specification (nominal and full-charge voltage on its label, and the cut-off voltage in the controller's or battery maker's documentation).
A large drop under load that brings the voltage near the cut-off points to the battery. Note the conditions with the readings: state of charge, temperature and load. A reading without its conditions is hard to compare later.
4. Connectors and wiring: look for heat
High current through a poor connection causes voltage loss and heat, and can trigger the same cut-out. Inspect:
- The battery-to-bike connector and the main power connectors at the controller
- Signs of heat: discoloured or melted plastic, darkened pins, a smell of burnt plastic
- Loose, corroded or recently disturbed connectors, and wires pinched at the frame or the steering
A connection that measures fine with no current can still lose voltage under load. Measuring the voltage on both sides of a connection while current flows shows whether that connection is dropping voltage.
5. Controller: current and temperature limits
Controllers protect themselves. If the controller limits or cuts out on long climbs or in hot weather, check whether it is overheating, whether it is the right controller for the motor and battery, and whether its settings were changed (some systems let dealers adjust current limits). A controller that cuts out the moment the motor starts, at any temperature, is more likely to see a problem on its output side, such as a damaged motor phase wire or connector.
6. Sensors and safety inputs
Brake cut-off switches, throttles, pedal-assist and speed sensors can all stop the motor while the display stays on. An intermittent brake switch is a common culprit: the controller sees "brake on" for a moment and cuts power. Check each input's wiring and connector, and test the sensors on their own (see our guide to testing a throttle with a multimeter).
7. Confirm the cause before you replace a part
Write down what you found and how you confirmed it, for example: "voltage dropped below the cut-off on a load test; a second, known-good battery cured the fault". A swap with a known-good part, or a measurement that clearly fails, is a confirmation. A part that "looked worn" is a suspicion. Keeping those two apart protects you when a customer comes back.
Here is what the checks above look like for a sample job, recorded in EVCore Studio:
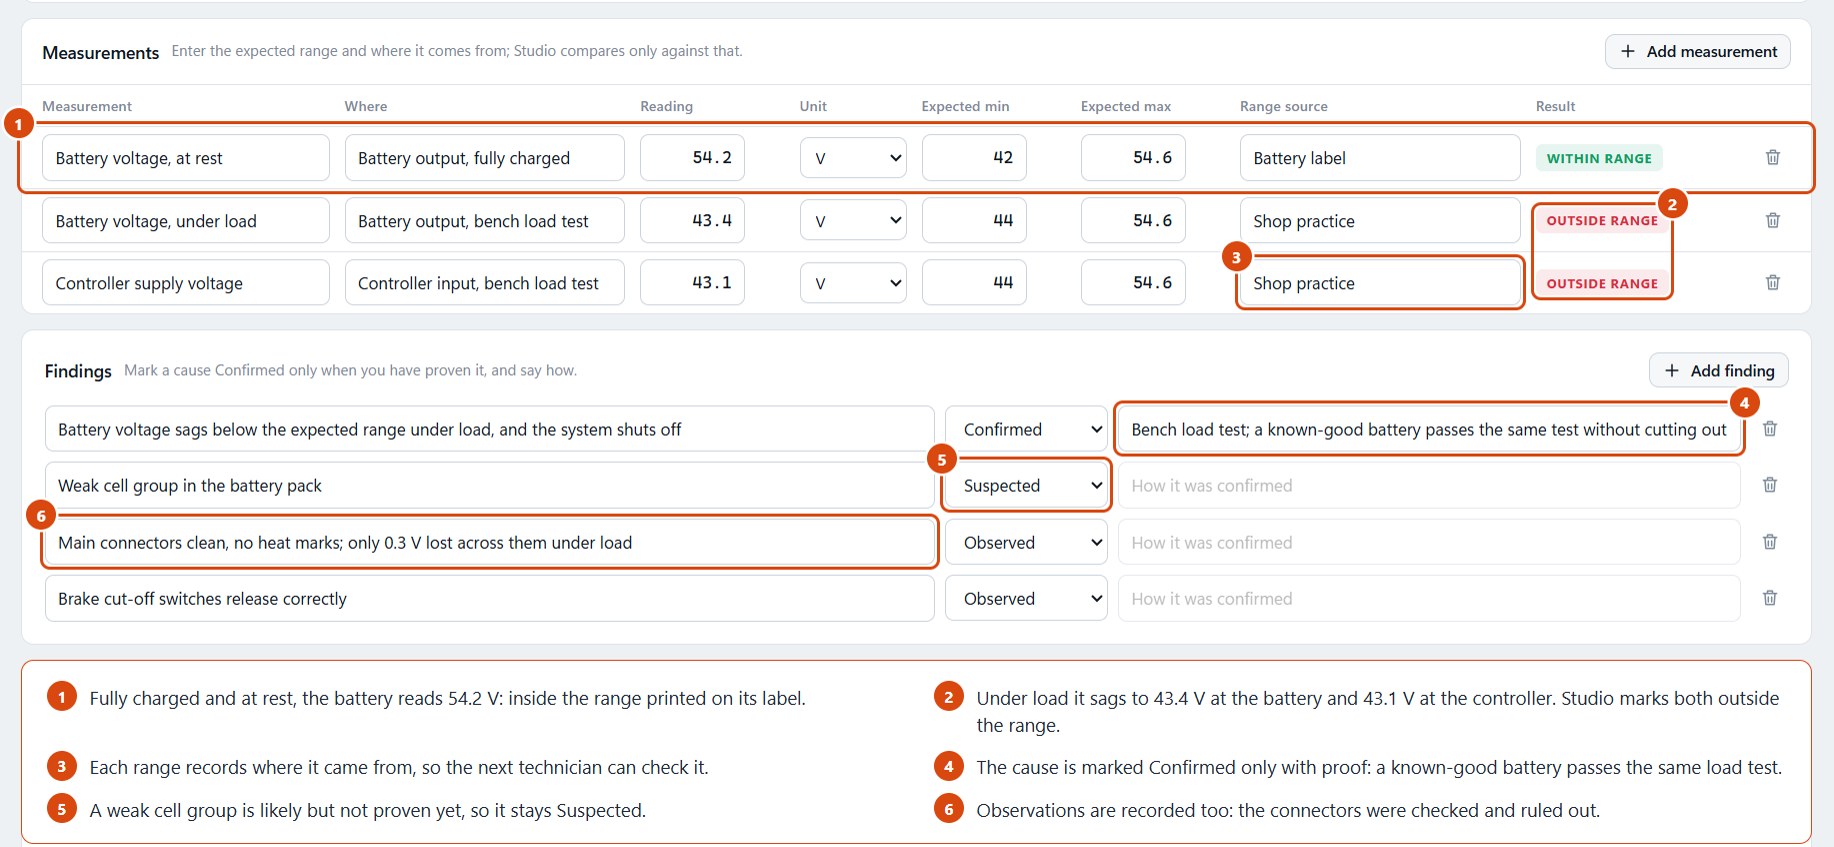
A sample job in EVCore Studio. The readings and ranges are examples: take yours from the battery label and the manufacturer's documentation.
Give the customer a clear record
Customers accept a battery replacement more easily when they can see the readings. A short report that lists the complaint, each measurement with its expected range and where that range came from, and the confirmed cause makes the repair easy to explain. EVCore Studio is built for exactly that: you record the readings against their range and the findings, and it produces the customer's PDF report with your shop's details. You can try it in the two-minute guided demo.